
There’s a special satisfaction in finishing a room with a perfectly hung mirror, frame, install yourself eye-catching canvas, or a meaningful photo frame. The problem? Many people either rush the process or get it wrong — ending up with crooked décor, damaged walls, or worse, something falling off completely.
If you’re ready to take control of your home projects, this DIY handyman guide will teach you exactly how to hang mirrors, canvases, and frames like a professional. We’ll cover:
- Placement planning (so your walls look like they belong in a showroom)
- Essential tools and why each one matters
- Step-by-step hanging instructions for different wall types
- Safety tips for heavy items
- Common mistakes to avoid
For more beginner-friendly projects, check out our Basic DIY Handyman Skills guide.
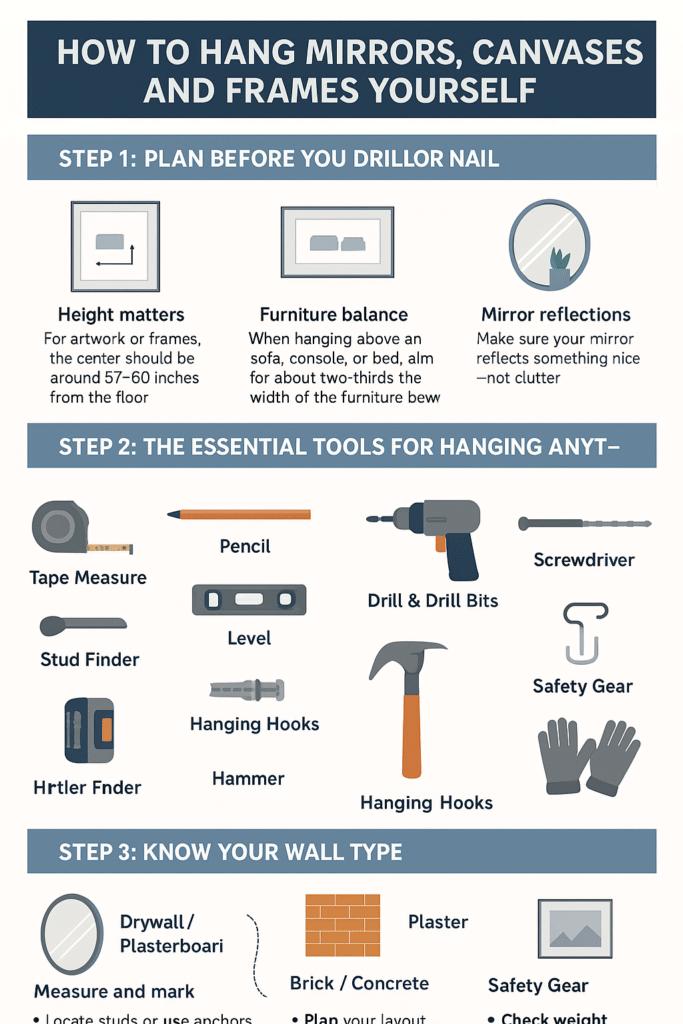
Step 1: Plan Before You Drill or Nail
The most important part of hanging any wall décor is planning. Poor planning leads to extra holes, uneven pieces, and frustration.
Key placement tips:
- Height matters: For artwork or frames, the center should be around 57–60 inches from the floor.
- Furniture balance: When hanging above a sofa, console, or bed, aim for about two-thirds the width of the furniture below.
- Mirror reflections: Make sure your mirror reflects something nice — a window, plant, or art — not clutter.
- Gallery walls: Lay frames on the floor first to plan spacing before committing to the wall.
For design inspiration, visit our Wall Décor Ideas for Small and Large Spaces.
Step 2: The Essential Tools for Hanging Anything
Whether you’re hanging a small canvas or a 20kg mirror, the right tools make the job easier, safer, and cleaner.
Must-have tools for DIY hanging projects:
- Tape Measure – Accuracy is key.
- Pencil – For erasable marking.
- Level – Bubble or laser, for perfect alignment.
- Drill & Drill Bits – Necessary for anchors and harder walls.
- Screwdriver – Manual or electric, depending on preference.
- Wall Plugs (Anchors) – To secure screws in drywall or masonry.
- Stud Finder – To locate solid anchor points.
- Hanging Hooks – D-rings, sawtooth hangers, or adhesive hooks.
- Hammer – Still useful for lightweight nails.
- Safety Gear – Gloves and safety glasses.
Want to know which tools are worth buying first? Check out our Beginner’s Handyman Tool Kit.
Step 3: Know Your Wall Type Before You Drill
Not all walls are created equal. Your method will depend on the material.
- Drywall / Plasterboard – Easy to drill, but needs anchors for heavy items unless you hit a stud.
- Brick / Concrete – Strong but requires masonry drill bits and plugs.
- Plaster – Can be brittle; drill slowly to avoid cracking.
If you’re unsure about your wall, our Guide to Identifying Wall Types can help.
Step 4: How to Hang a Mirror Like a Pro
Mirrors can be tricky because they’re heavy and fragile.
Steps:
- Measure and mark the center point.
- Use a stud finder for secure mounting or install heavy-duty wall anchors.
- Attach D-rings, hanging wire, or a French cleat system.
- Drill holes, insert plugs, and screw in hooks.
- Lift and hang with assistance, then level.
For large mirrors, see our Heavy Object Wall Mounting Guide.
Step 5: Hanging a Canvas the Easy Way
Canvases are lightweight, making them ideal beginner projects.
Steps:
- Mark the placement height.
- Use nails, adhesive hooks, or small screws.
- For larger canvases, use two hooks for stability.
For more decorative ideas, read Creative Ways to Display Canvas Art.
Step 6: Hanging a Frame Without the Crooked Look
Framed pictures can be heavier than canvases, especially with glass.
Steps:
- Check the weight and choose appropriate fixings.
- Use two hooks to prevent tilting.
- Hang from the existing wire or sawtooth hanger.
Need help grouping multiple frames? Our Gallery Wall Hanging Tips guide is packed with layout ideas.
Step 7: Safety & Stability Tips for Hanging
- Always use fixings rated for the item’s weight.
- Avoid placing heavy mirrors above beds or baby cribs.
- In earthquake-prone areas, secure the bottom edge.
- When renting, consider removable adhesive hooks.
For renters, our Damage-Free Hanging Solutions is a must-read.
Step 8: Common Mistakes to Avoid
- Not using a level — Even small tilts are noticeable.
- Choosing the wrong anchors — Causes items to fall.
- Skipping measurement checks — Leads to uneven results.
- Hanging too high or low — Disrupts room balance.
Final Thoughts
Doing your own wall décor hanging is more than just a money-saver — it’s a skill that gives you control over your home’s look. With the right tools, careful planning, and a steady hand, you can hang mirrors, canvases, and frames just as well as any professional.
If you’re new to DIY handyman work, start with smaller projects, then build up to larger, heavier pieces. Over time, you’ll develop the confidence and precision that makes your walls stand out for all the right reasons.For more tutorials, visit our DIY Handyman Tips & Projects Hub.